
Qualys Virtual Scanner Appliance is available as an Amazon Machine Image (AMI) at AWS Marketplace, ready for customers to launch onto Amazon EC2-Classic and EC2-VPC.
The scanner deployment involves:
Configuration in Qualys | Configuration in AWS
Following are some recommendations from Qualys for deploying scanners based on the network topology and the size of the EC2 instance for hosting the scanner appliance.
To host the Qualys Virtual Scanner Appliance, the maximum supported size for a scanner instance by Qualys is 16 CPUs and 16 GB RAM. In addition, we do not support scanner deployment on ARM-based architecture instance types such as A1, c6g, m6g, t4g, and r6g instance families. Based on the number of EC2 instances being scanned, and the number of times the instances are scanned, you can scale up to 16 CPUs and 16 GB RAM.
Qualys Virtual Scanner Appliance can also be deployed on instance types that support enhanced networking (ENA) and NVMe SSD Volumes. Please refer to the following table for networking and storage features supported by AWS in their current generation instance types:
https://docs.aws.amazon.com/AWSEC2/latest/UserGuide/instance-types.html#instance-type-summary-table
Please note that Qualys Virtual Scanner Appliance can only be deployed on instance types that have a maximum of 16 CPUs and 16 GB RAM.
By default, scans cannot be launched on targets with t1.micro, m1.small, t2.nano instance types. Please reach out to your Technical Account Manager or Qualys Support to lift this limitation and allow assets with these instance types to be auto-activated based on the connector settings.
Amazon Virtual Private Cloud (Amazon VPC) offers a comprehensive set of virtual networking capabilities that provide AWS customers with many options for designing and implementing networks on the AWS cloud. With Amazon VPC, customers can provision logically isolated virtual networks to host their AWS resources. Based upon how you have setup you AWS network, here are some recommendations on how you can place your scanner.
--Non peered VPCs in a region - Qualys recommends to have one or more scanners per VPC per region if the VPCs are non peered.
--Peered VPCs in a region - you can have one or more scanners in the central VPC which is peered to other VPC in a region (hub 'n' spoke model).
--VPCs across regions - you can have one or more scanners in a VPC which has VPN or VPC-transit to other regions.
The following features are not supported and are disabled in all cloud (private and public) platforms:
- WAN/Split network SETTINGS - “WAN Interface” option for split network settings is not available from Scanner UI/console. Only LAN/single network settings from Cloud UI, used for both scanning and connecting to Qualys servers, are supported
- NATIVE VLAN - “VLAN on LAN” option for configuring Native VLAN is not available from scanner UI/console
- STATIC VLAN (IPV4 AND IPV6) - "VLANs" option for configuring static VLANs is not available from Qualys UI
- STATIC ROUTES (IPV4 AND IPV6) - Option to configure “Static Routes” is not available from Qualys UI
- IPV6 ON LAN - Option to configure “IPv6 on LAN” is not available from Qualys UI
The Virtual Scanner option must be turned on for your account. Contact Qualys Support or your Technical Account Manager if you would like us to turn on this option for you.
You must be a Manager or a sub-user with the “Manage virtual scanner appliances” permission. This permission may be granted to Unit Managers. Your subscription may be configured to allow this permission to be granted to Scanners.
You'll add a new virtual scanner appliance and get your personalization code.
Go to Scans > Appliances and select New > Virtual Scanner Appliance. Choose "I have my image" and click Continue.
Give your scanner a name. If you’re a sub-user then you’ll need to pick an asset group that has been assigned to your business unit by a Manager user. Not seeing any asset groups? Please ask a Manager to assign an asset group (other than the All group) to your business unit.
Follow the on-screen instructions to configure your virtual scanner and get your personalization code. You'll need this to launch your AMI instance.
Qualys virtual scanners can be launched from the AWS marketplace or from a custom AMI that has been shared with your AWS account. You can also launch an AMI instance using the AWS Management Console (i.e. sign-in to the console, go to Services > EC2 and enter AMI settings per below).
1) Deploy the Qualys Virtual Scanner Appliance
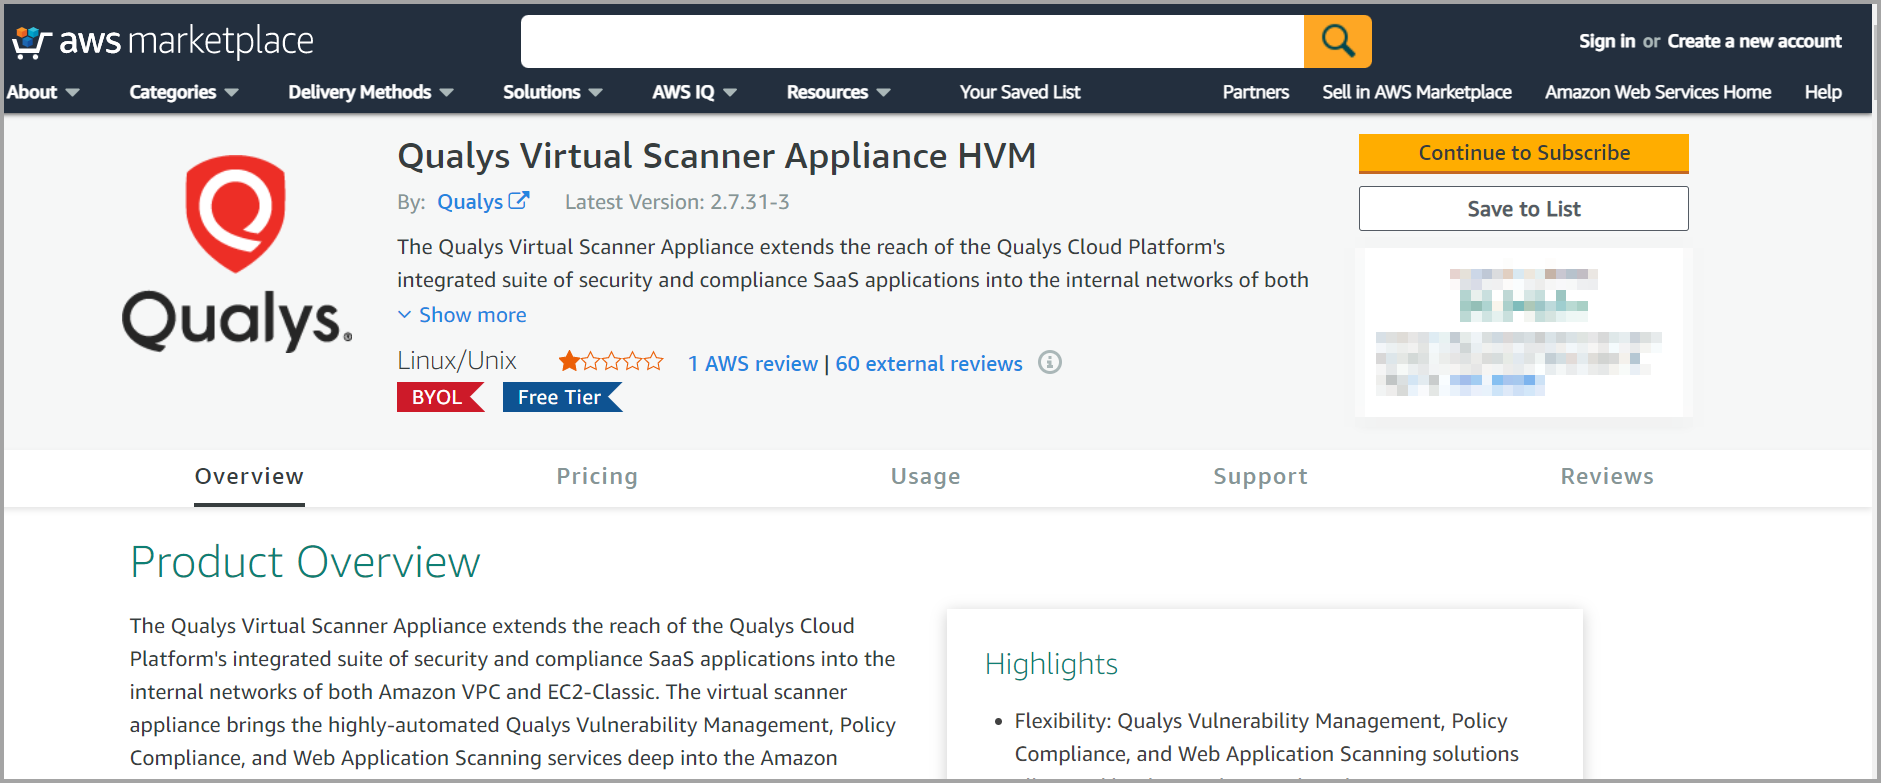
To Launch from the AWS Marketplace
Go to Qualys Virtual Scanner Appliance page at AWS Marketplace and login to your AWS account.
Qualys Virtual Scanner Appliance HVM on AWS Marketplace
To Launch a Custom AMI from AWS Console
To launch from a custom AMI that has been shared with your AWS account, login to your AWS console and go to Images - AMI - Private Images - enter 'qVSA' in the search box and you should see all Qualys virtual scanner images shared with your account:

2) Launch the virtual scanner AMI in a region.
3) Use the wizard to enter AMI settings. In the Advance Details section, use "V1 and V2 (token optional)" as the Metadata version. Currently, Qualys does not support V2 (token required). So, in the User data field, you must enter the personalization code you obtained from the Qualys user interface and optionally proxy server (if used).
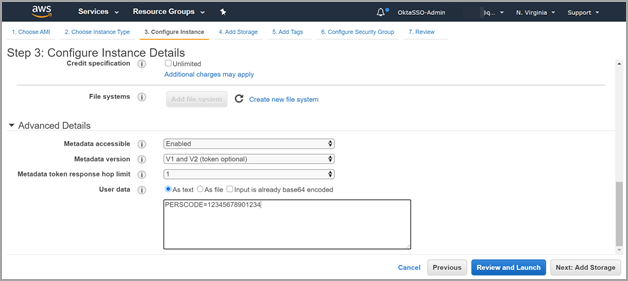
Personalization Code - Enter the personalization code that you obtained from Qualys preceded by PERSCODE=
Proxy Server (Optional) - Enter Proxy Server information on a separate line from the personalization code, preceded by PROXY_URL. A proxy server is used when your scanner does not directly connect to the Qualys Cloud Platform.
Important: The proxy server needs to allow access to AWS region-specific endpoints. Go here to learn about regions & endpoints: http://docs.aws.amazon.com/general/latest/gr/rande.html#ec2_region
Example:
PERSCODE=12345678901234
PROXY_URL=username:password@proxyhost:port
Formatting:
If you have a domain user, the format is domain\username:password@proxyhost:port
If authentication is not used, the format is proxyhost:port
proxyhost is the IPv4 address or the FQDN of the proxy server.
When deploying the Qualys Virtual Scanner Appliance via CLI or automation script, it is best to first query for the latest Qualys Virtual Scanner Appliance version available in the AWS Marketplace.
Run the following AWS CLI command to query for the available Qualys Virtual Scanner Appliance AMIs in the marketplace:
aws ec2 describe-images --executable-users all --filters Name=name,Values=qVSA*standard*
Run this command to return only the AMI ID and image name:
aws ec2 describe-images --executable-users all --filters Name=name,Values=qVSA*standard* --query 'Images[].[ImageId,Name]' --output text
This step registers the Virtual Scanner Appliance with your Qualys account. Also, your appliance will download all the latest software updates right away, so it’s ready for scanning.
Setup following outbound rule in security group assigned to scanner appliance.
If you are using a proxy server, ensure you have an outbound rule allowing access on port 443 and the port used to communicate with a proxy server.
--If the scanner appliance has direct internet connectivity, ensure that out bound rule allows access on port 443 to Qualys Security Operations Center (SOC) IP address. You can get the SOC IP address range by logging in to Qualys Portal and navigating to the Help > About option.
--The scanner should be able to reach out to all the target instances for running the scan. It is recommended to configure an outbound rule that allows access to all ports and subnets of the EC2 instances that the scanner is going to scan.
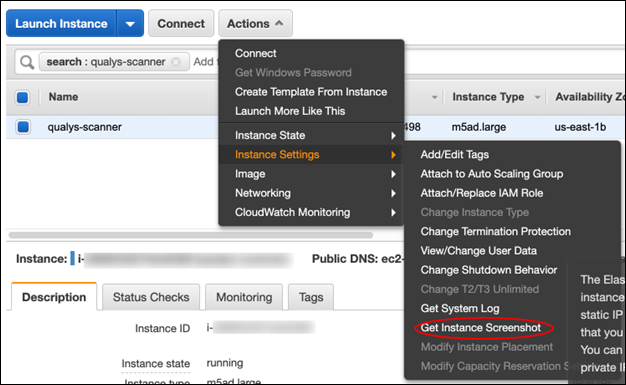
To troubleshoot or check for errors with your Qualys Virtual Scanner Appliance, you can access the system logs from 'Get Instance Screenshot' and 'Get System Log' features within AWS EC2.
To generate the scanner instance console screenshot, log into the EC2 console GUI and locate your scanner instance. Click on Actions - Instance Settings - Get Instance Screenshot:
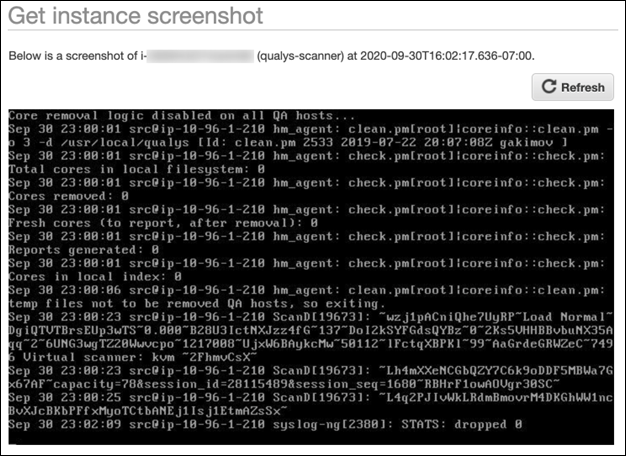
Click the Refresh button to fetch the latest set of logs.
'Get System Log' displays the serial console output that returns buffered information posted shortly after an instance transition state (start, stop, reboot, and terminate).
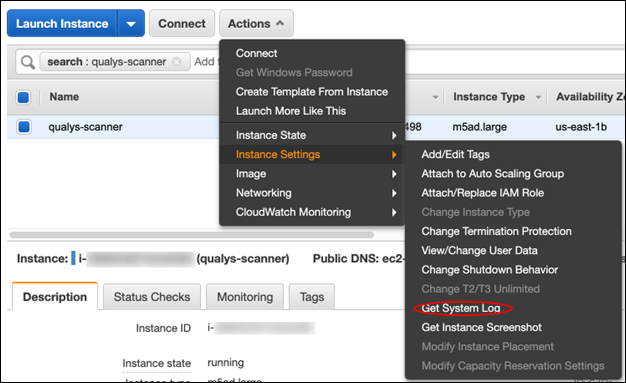
To generate the serial console output logs, log into the EC2 console GUI and locate your scanner instance. Click on Actions - Instance Settings - Get System Log:
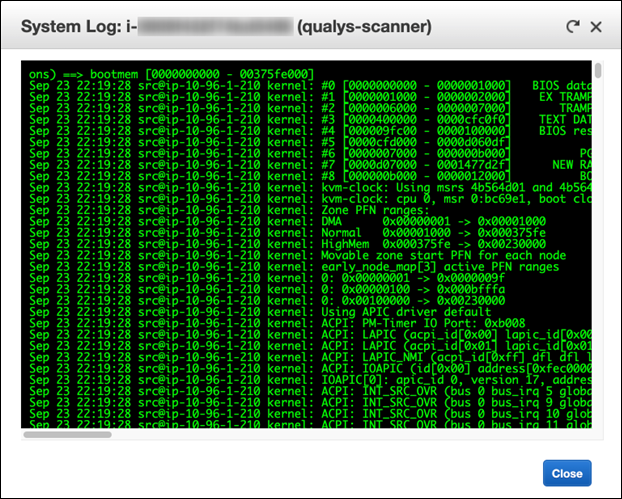
Note: From the EC2 console GUI, the posted output is not continuously updated and has a limit of displaying the first 64 KB console output.
To retrieve the latest 64 KB of serial console output via AWS CLI, the scanner instance needs to be deployed on a Nitro-based hypervisor. For a list of instance types built on the Nitro System, visit here.
By default, the serial console output returns buffered information that was posted shortly after an instance transition state (start, stop, reboot or terminate). This information is available for at least one hour after the most recent post. Only the most recent 64 KB of serial console output is available.
You can optionally retrieve the latest serial console output at any time during the instance lifecycle using the ‘--latest’ option. This option is supported on instance types that use the Nitro hypervisor.
To fetch the serial console logs via CLI:
1) Set up and configure your AWS CLI environment using AWS latest CLI version, https://docs.aws.amazon.com/cli/latest/userguide/cli-chap-install.html
2) Run the following AWS CLI command:
aws ec2 get-console-output --instance-id <instance id> --latest --output text
Note: ‘--latest’ option is only supported on instance types that use the Nitro Hypervisor.
For any errors and troubleshooting tips, please visit Scanner Appliance Troubleshooting and FAQ